
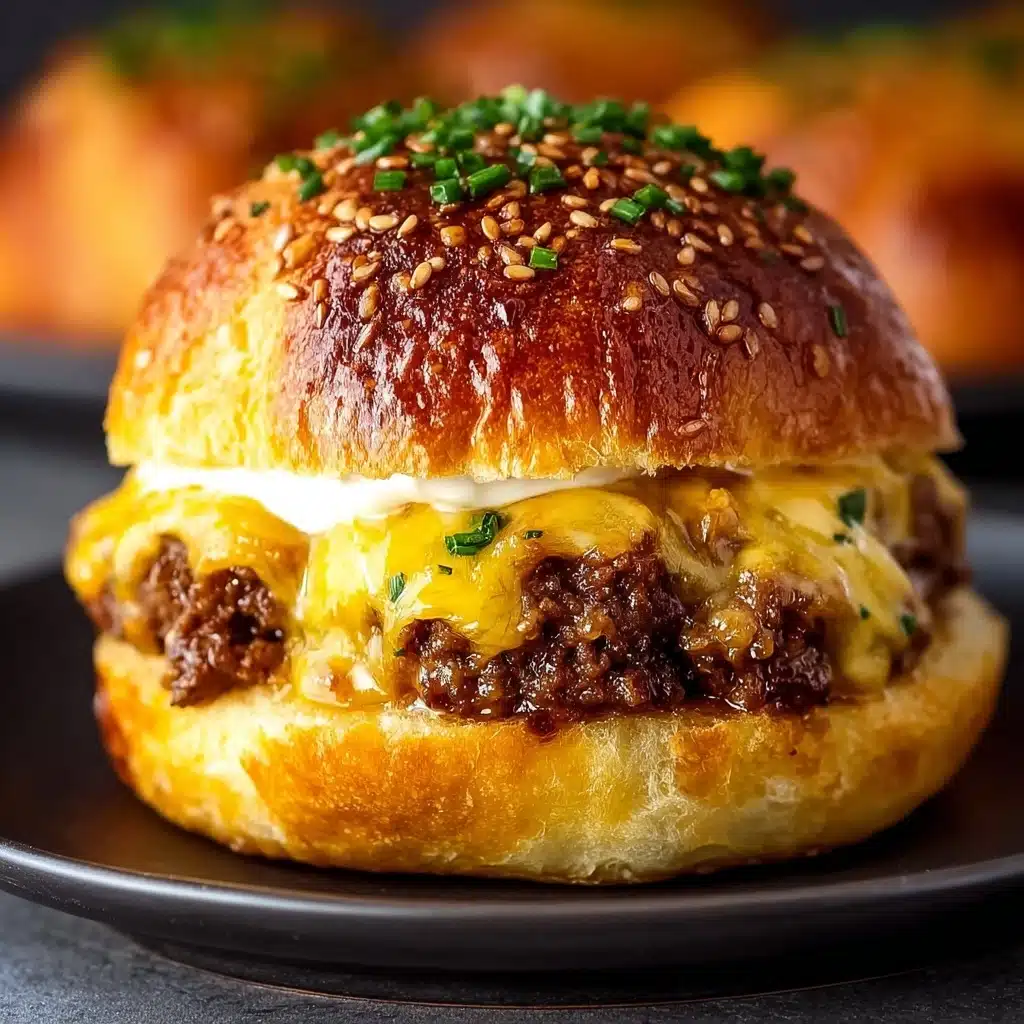
The Ultimate Recipe Guide Recipe
If you’re looking for the most delicious, crowd-pleasing comfort food with a twist, Garlic Parmesan Cheeseburger Bombs are exactly what you need! These little bundles of joy feature juicy, flavor-packed beef, gooey cheddar cheese, and aromatic garlic all wrapped up in a pillowy biscuit dough—ready to grab, dip, and devour. This is The Ultimate Recipe Guide for anyone who loves cheeseburgers with a flavor explosion in every bite, and a playful, shareable presentation. Whether you’re cooking for your family or hosting a game night, this recipe will have everyone coming back for seconds (and maybe thirds).
Ingredients You’ll Need
There’s beauty in how simple, yet essential, every ingredient is for these Garlic Parmesan Cheeseburger Bombs. Each component plays a starring role in creating the crave-worthy flavor, melt-in-your-mouth texture, and eye-catching golden finish. Here’s what you’ll need:
- Ground Beef (80/20 blend): This ratio gives the perfect balance of juiciness and flavor for your filling.
- Grated Parmesan Cheese: Adds savory depth inside the meatballs and a rich, crispy crust on top.
- Fresh Garlic (minced): Packs a punch of aromatic, irresistible garlic flavor.
- Garlic Powder: Doubles down on that garlicky goodness for every bite.
- Onion Powder: Lends a mild, sweet undertone to the meat.
- Red Pepper Flakes (optional): Just a hint wakes up the flavor without making things spicy. Add more if you like a little heat!
- Salt and Freshly Ground Black Pepper: The basics—but don’t underestimate their power to round out the flavors.
- Refrigerated Biscuit Dough: Store-bought biscuits make this recipe a breeze while giving that classic golden, fluffy crust.
- Cheddar Cheese Slices: Melty, sharp cheddar oozes out in the best way; cutting them in quarters makes wrapping easy.
- Butter (melted): Adds buttery richness and helps parsley and Parmesan stick on top.
- Fresh Parsley: A final flourish of color and brightness.
- Milk or Egg Wash: Promotes perfect browning and shine as the bombs bake.
- Sesame Seeds (optional): For a hint of crunch and that classic burger bun look!
How to Make The Ultimate Recipe Guide
Step 1: Combine the Beef and Seasonings
Start by gently mixing your ground beef with half of the Parmesan, minced garlic, garlic powder, onion powder, red pepper flakes (if using), salt, and pepper. This mixture is the foundation for your cheeseburger bombs, infusing every bite with robust, savory flavor. Go easy with the mixing—overworking beef can make it dense instead of juicy.
Step 2: Mix Thoroughly (But Gently!)
Using your hands, combine everything until the seasonings look evenly dispersed. Stop as soon as things look well-mixed; your burgers will thank you by staying tender and luscious. If you’ve never mixed ground beef by hand, it’s oddly satisfying!
Step 3: Form into Balls
Divide the beef mixture into eight equal mounds and gently roll each into a ball. These little orbs are about to become cheesy, garlicky pockets of joy inside their biscuit shell. Set them aside while you work on your dough.
Step 4: Prepare the Biscuit Dough
Preheat your oven to 375°F (190°C) to get things nice and hot for a fast, even bake. Lightly grease a baking sheet, or throw down a sheet of parchment for stress-free cleanup. This step ensures your cheeseburger bombs release easily and bake to golden perfection.
Step 5: Open the Biscuit Can
Grab your can of biscuit dough and give it that classic “pop!” You’ll have eight biscuits—perfect for this recipe and so easy to work with.
Step 6: Flatten the Biscuits
Place each biscuit on a lightly floured surface, flattening gently into a 4-5 inch circle. Use your hands or a rolling pin, whichever is more fun for you! They don’t need to be perfect—just large enough to envelop the beef and cheese.
Step 7: Add Cheese and Beef
Set a quarter slice of cheddar right in the center of each flattened biscuit. Now top with a beef ball. The cheese melts against the beef while baking, delivering serious “cheeseburger” vibes.
Step 8: Wrap the Beef
Gently pull up the edges of the biscuit dough around each beef and cheese stack, pinching tightly to seal the seams. Flour your fingers if the dough is sticky; a tight seal keeps your cheesy filling tucked inside while baking.
Step 9: Repeat
Continue flattening, cheesing, and wrapping until all eight bombs are assembled. This process gets easier as you go, and it’s a fun step for little helpers!
Step 10: Place on Baking Sheet
Arrange the bombs seam-side down on your baking sheet, leaving a little breathing room between each one. This ensures they bake and brown evenly—no soggy sides here!
Step 11: Brush with Milk or Egg Wash
Whisk together your milk or an egg, then lightly brush the tops of each bomb. This little extra step delivers unbeatable shine and color.
Step 12: Sprinkle with Parmesan and Sesame Seeds (Optional)
Shower the remaining Parmesan over the tops, and if you’re feeling playful, add sesame seeds too. These toppings create a cheesy, slightly salty crust that’s irresistible.
Step 13: Bake
Bake for 15-20 minutes, until the bombs are beautifully golden on top and the beef reaches an internal temp of 160°F (71°C). Your kitchen will smell amazing—a promise!
Step 14: Melt the Butter
During the last few minutes of baking, melt your butter. Warm butter goes on easiest and creates that classic, glossy finish.
Step 15: Brush with Butter
Right out of the oven, brush those golden-brown tops with your melted butter. This not only adds flavor, but helps the fresh parsley and final Parmesan dusting stick.
Step 16: Garnish and Serve
Sprinkle with chopped parsley for a fresh, colorful finish. Let the cheeseburger bombs cool just a few minutes—they’re best enjoyed warm, when the cheese is perfectly melty and the biscuits are still fluffy.
How to Serve The Ultimate Recipe Guide

Garnishes
A generous sprinkle of fresh parsley right as they come out of the oven adds a bright pop of green and a hint of herbal freshness. You can even dust another light layer of Parmesan for extra cheesy goodness. If you want them to look a bit like mini burger buns, don’t forget the sesame seeds!
Side Dishes
Classic choices like crispy fries, tater tots, or a crunchy coleslaw pair perfectly with these cheeseburger bombs. If you’re aiming for a lighter touch, a simple salad of mixed greens brings a cool, crisp contrast to the warm, cheesy center. Kids will love baby carrots or sliced cukes with ranch or ketchup for dipping!
Creative Ways to Present
Try stacking them on a platter with festive toothpicks for a party, or serve as sliders with a side of burger fixings—think tiny pickles, ketchup, or spicy mayo. For game day, set out a dipping bar with sauces like barbecue, buffalo, or honey mustard for everyone to create their own flavor adventure. The Ultimate Recipe Guide makes them perfect for any occasion!
Make Ahead and Storage
Storing Leftovers
Let any leftover cheeseburger bombs cool completely, then pop them in an airtight container. They’ll keep up to three days in the fridge. They hold up remarkably well, and the biscuit stays surprisingly tender!
Freezing
You can absolutely freeze these! Just wrap each cooled bomb individually in plastic wrap or foil, then store in a freezer bag. They’ll keep for up to two months. When you want a quick snack or lunch, you’re already halfway there.
Reheating
For best results, reheat in a 350°F oven for about 10 minutes or until warmed through. This helps the biscuit regain its crispy edge and the cheese to melt again. The microwave works in a pinch, but the biscuit may get a bit soft.
FAQs
Can I use ground turkey or chicken instead of beef?
Absolutely! Swap in ground turkey or chicken for a lighter version. Just be sure to check for doneness, as lean meats cook a bit faster and can dry out more easily. The Ultimate Recipe Guide works for all your protein preferences!
What dipping sauces go best with cheeseburger bombs?
Classic ketchup, mustard, and ranch are always hits, but get adventurous with spicy barbecue, sriracha mayo, or garlic aioli. Since these are garlicky and cheesy, bold sauces really shine!
Can I make these ahead for a party?
Yes! Assemble up to the baking step and pop the tray in the fridge, covered. When you’re ready to party, just brush with egg wash, sprinkle toppings, and bake fresh. The Ultimate Recipe Guide ensures you’ll always have a crowd-pleaser ready in advance.
Do I have to use canned biscuit dough?
Canned dough is a big time-saver, but homemade biscuit or pizza dough works beautifully too. Just make sure it’s rolled thin enough to seal tightly around the filling.
How do I keep the cheese from leaking while baking?
Really pinch those seams together and double-check there are no holes before baking. It also helps to place them seam-side down on the tray. The Ultimate Recipe Guide has all the tips you need for keeping your bombs intact!
The Ultimate Recipe Guide: Final Thoughts
If you’re searching for an easy, flavorful, and totally fun twist on the classic cheeseburger, give this recipe a whirl. The Ultimate Recipe Guide means even busy weeknights or party prep become special with just a few simple steps. Each bite bursts with savory, garlicky, cheesy flavor. I can’t wait for you to try it—and wow everyone at your table with your irresistible Garlic Parmesan Cheeseburger Bombs!
Print
The Ultimate Recipe Guide Recipe
- Total Time: 35-40 minutes
- Yield: 8 cheeseburger bombs 1x
- Diet: Vegetarian
Description
These Garlic Parmesan Cheeseburger Bombs are a delicious twist on classic cheeseburgers, featuring flavorful ground beef wrapped in biscuit dough with gooey cheddar cheese and a savory garlic Parmesan topping. Perfect for a fun and tasty meal!
Ingredients
For the Beef Mixture:
- 1 pound ground beef (80/20 blend recommended)
- 1/2 cup grated Parmesan cheese, divided
- 2 cloves garlic, minced
- 1 teaspoon garlic powder
- 1/2 teaspoon onion powder
- 1/4 teaspoon red pepper flakes (optional, for a little kick)
- Salt and freshly ground black pepper to taste
For the Cheeseburger Bombs:
- 1 (10 ounce) can refrigerated biscuit dough (such as Pillsbury Grands!)
- 8 slices cheddar cheese, cut into quarters
- 2 tablespoons butter, melted
- 1 tablespoon chopped fresh parsley (for garnish)
- 1/4 cup milk or egg wash (for brushing)
- Sesame seeds (optional, for topping)
Instructions
- Combine the Beef and Seasonings: In a large bowl, gently combine the ground beef, 1/4 cup of grated Parmesan cheese, minced garlic, garlic powder, onion powder, and red pepper flakes (if using). Season generously with salt and freshly ground black pepper.
- Mix Thoroughly (But Gently!): Use your hands to mix the ingredients together until everything is evenly distributed. Be careful not to overmix, as this can make the beef tough.
- Form into Balls: Divide the beef mixture into 8 equal portions. Roll each portion into a ball. Set them aside for now.
- Prepare the Biscuit Dough: Preheat your oven to 375°F (190°C). Lightly grease a baking sheet or line it with parchment paper.
- Open the Biscuit Can: Open the can of refrigerated biscuit dough. You should have 8 biscuits.
- Flatten the Biscuits: On a lightly floured surface, gently flatten each biscuit into a circle, about 4-5 inches in diameter. You can use a rolling pin or just your fingers.
- Add Cheese and Beef: Place a quarter of a cheddar cheese slice in the center of each flattened biscuit. Then, place one of the beef balls on top of the cheese.
- Wrap the Beef: Carefully wrap the biscuit dough around the beef ball, pinching the edges together to seal completely. Make sure there are no gaps, or the cheese will leak out during baking. If the dough is too sticky, lightly flour your fingers.
- Repeat: Repeat steps 3-5 with the remaining biscuits, cheese, and beef balls.
- Place on Baking Sheet: Place the assembled cheeseburger bombs on the prepared baking sheet, seam-side down. Leave a little space between each bomb to allow for even baking.
- Brush with Milk or Egg Wash: In a small bowl, whisk together the milk or egg wash. Brush the tops of the cheeseburger bombs with the milk or egg wash.
- Sprinkle with Parmesan and Sesame Seeds (Optional): Sprinkle the remaining 1/4 cup of Parmesan cheese evenly over the tops of the cheeseburger bombs. If desired, sprinkle with sesame seeds for added texture and flavor.
- Bake: Bake in the preheated oven for 15-20 minutes, or until the biscuits are golden brown and the beef is cooked through. The internal temperature of the beef should reach 160°F (71°C).
- Melt the Butter: While the cheeseburger bombs are baking, melt the butter in a small bowl.
- Brush with Butter: Once the cheeseburger bombs are out of the oven, immediately brush them with the melted butter.
- Garnish and Serve: Sprinkle with chopped fresh parsley for a pop of color and freshness. Let the cheeseburger bombs cool slightly before serving. They’re best enjoyed warm!
Notes
- Feel free to customize these cheeseburger bombs with your favorite burger toppings like pickles, bacon, or jalapenos.
- For a vegetarian version, you can use plant-based ground meat and vegan cheese.
- These make a great appetizer or party snack!
- Prep Time: 20 minutes
- Cook Time: 15-20 minutes
- Category: Main Course
- Method: Baking
- Cuisine: American
Nutrition
- Serving Size: 1 cheeseburger bomb
- Calories: 350
- Sugar: 2g
- Sodium: 650mg
- Fat: 22g
- Saturated Fat: 10g
- Unsaturated Fat: 10g
- Trans Fat: 0g
- Carbohydrates: 19g
- Fiber: 1g
- Protein: 20g
- Cholesterol: 60mg
Keywords: Garlic Parmesan Cheeseburger Bombs, Cheeseburger Bombs recipe, Garlic Parmesan recipe


